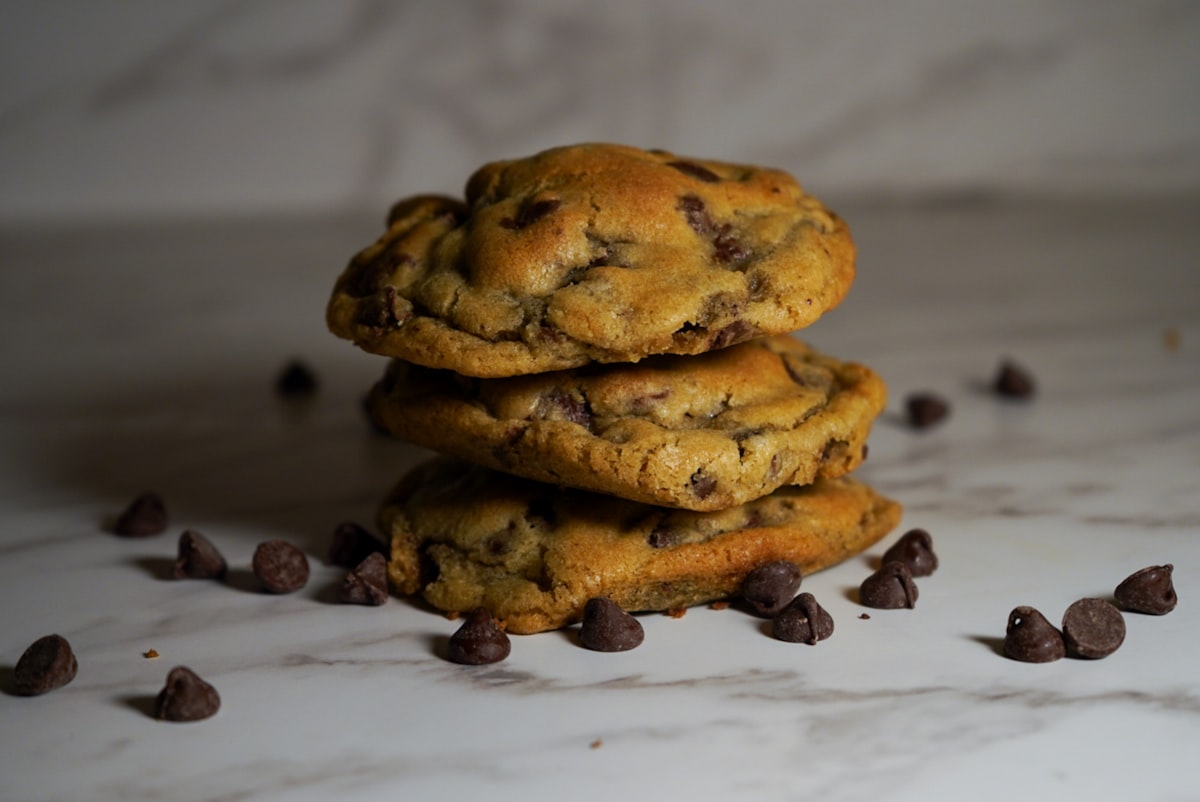
The Secret to Perfect Soft Cookies Every Time
Ask ten bakers what makes the perfect soft cookie and you'll get ten different answers. After years of testing — and more flat, crunchy, disappointing batches than I'd like to admit — I've come to believe that soft cookies aren't about a single magic ingredient. They're about understanding a few simple principles and making small, deliberate choices at each step. Once you know what each decision does, you can bend any recipe toward the texture you love.
This is the guide I wish someone had handed me when I started. Let's walk through it together, from the butter all the way to the moment you pull the tray out of the oven.
It All Starts With the Butter
If there's one place where soft cookies are won or lost, it's the butter. Specifically, its temperature. "Room temperature" is the most misunderstood instruction in all of baking. Butter that's too warm — soft, greasy, almost melting — will spread into thin, crisp puddles in the oven. Butter that's too cold won't cream properly and your cookies will be dense and cakey.
The butter you want should be cool to the touch but yield easily when you press it. Around 65°F is the sweet spot. It should hold the dent of your finger without your finger sinking straight through. If you've left it out and it's gone shiny and soft, pop it back in the fridge for ten minutes.
When you cream that properly softened butter with sugar, you're not just mixing — you're whipping tiny air bubbles into the fat. Those bubbles give your cookies structure and lift. Cream it for two to three full minutes until the mixture is pale and fluffy. But here's the catch for soft cookies: don't overdo it. Too much air can cause cookies to rise dramatically and then collapse, leaving them thin. Pale and fluffy, then stop.
A note on melted butter: some soft-and-chewy recipes call for it deliberately. Melted butter means no air is whipped in, which produces a denser, chewier, fudgier cookie. It's a legitimate technique — just know that you're trading a little lift for a lot of chew.
Sugar Is a Texture Tool, Not Just a Sweetener
Most people think of sugar as the thing that makes cookies sweet. It does, but it also controls moisture and spread, and the type of sugar matters enormously.
Brown sugar is your best friend for soft cookies. It contains molasses, which is hygroscopic — a fancy word meaning it attracts and holds onto moisture. Cookies made with more brown sugar stay soft and moist for days. White granulated sugar, on the other hand, encourages crisp edges and more spread.
The ratio is your dial. A cookie that's mostly brown sugar will be soft, chewy, and a little denser. A cookie that's mostly white sugar will be crisp and spread thin. For the soft-but-still-structured cookie most people are chasing, I like a ratio that leans toward brown sugar — say, two parts brown to one part white. Play with it and you'll quickly find your preference.
The Mixing Mistake Almost Everyone Makes
Here's where so many good intentions go wrong: overmixing the flour.
Flour contains proteins that form gluten when they're worked and hydrated. A little gluten gives cookies their chew. Too much gluten makes them tough and bread-like. Every extra turn of the mixer once the flour goes in develops more gluten.
The fix is simple: add your dry ingredients and mix on low speed only until the last streaks of flour disappear. Then stop. I often finish the final few folds by hand with a spatula, which gives me more control and keeps me from absentmindedly running the mixer too long. Fold in your chocolate chips or add-ins at this stage too — they help you avoid overworking the dough because you have to be gentle.
Measuring flour correctly matters just as much here. Scooping your measuring cup directly into the bag packs in far too much, and too much flour is the number one cause of dry, dense cookies. Spoon the flour into the cup and level it off, or better yet, weigh it. A kitchen scale is the single best upgrade you can make as a baker.
Why Chilling the Dough Changes Everything
If you've ever wondered why bakery cookies look so thick and gorgeous while yours spread into one sad sheet, the answer is usually chilling.
Resting the dough in the fridge does two wonderful things. First, it solidifies the fat, so the cookies hold their shape longer in the oven and spread less. Second — and this is the part people skip — it gives the flour time to fully hydrate and the flavors time to deepen. Dough chilled for 24 to 72 hours bakes up with a richer, almost toffee-like flavor and a beautifully chewy texture. It's the difference between a good cookie and one people ask you to make again.
You don't always need a multi-day rest. Even 30 to 60 minutes in the fridge makes a noticeable difference in spread and thickness. If you're in a hurry, scoop the dough into balls first and chill those — they cool faster than a big block.
Reading the Oven, Not Just the Timer
The oven is where patience pays off — and where most soft cookies are accidentally ruined. The single biggest secret to a soft center is this: take them out before they look done.
Cookies continue to bake on the hot tray after they leave the oven. If you wait until the centers look fully set and golden, you've already overbaked them. Pull them when the edges are set and lightly golden but the centers still look slightly underbaked and puffy. They'll finish cooking from residual heat as they rest on the pan.
A few more oven truths worth knowing:
- Your oven lies. Most home ovens run 15 to 25 degrees off their dial. A cheap oven thermometer will tell you the truth and solve mysteries you didn't know you had.
- Light pans bake gentler. Dark metal pans absorb more heat and brown the bottoms faster. If your cookie bottoms scorch, switch to a lighter sheet or double up your pans.
- Always use parchment. It promotes even baking, prevents sticking, and protects the bottoms.
- One tray at a time, middle rack. Crowding two trays leads to uneven baking. If you must bake two at once, rotate and swap them halfway through.
After baking, let the cookies sit on the hot sheet for about five minutes to finish setting, then move them to a wire rack. Pulling them off too soon means they'll tear; leaving them on too long means the bottoms keep cooking.
The Little Things That Make a Big Difference
A few final habits separate consistently great cookies from occasionally great ones:
- Use room-temperature eggs. They incorporate more smoothly and evenly into the batter.
- Don't skimp on salt. Salt sharpens sweetness and makes the chocolate taste more like chocolate. A flaky pinch on top right after baking is pure magic.
- Scoop evenly. A cookie scoop gives uniform sizes that bake at the same rate, so you're not pulling some raw and some burnt.
- Store them with a slice of bread. Tuck a piece of sandwich bread into the cookie container. The cookies pull moisture from the bread and stay soft for days. It sounds odd; it works beautifully.
Ingredients Are Worth Caring About
We've talked a lot about technique, but the cookies you bake can only be as good as what goes into them, and a few ingredient choices quietly make a big difference. Use real butter, not a spread or a "baking blend" — the water content in those is different and it changes how cookies spread and brown. Pure vanilla extract over imitation is a small upgrade you'll taste, especially in a simple cookie where there's nowhere for cheap flavor to hide.
Chocolate is the other place to spend a little care. Chocolate chips are designed to hold their shape, which is lovely for a classic look, but if you want those dramatic melty pools, chop a bar of good chocolate instead. The uneven pieces give you everything from fine flecks to molten puddles, and the flavor of a quality chocolate carries the whole cookie. A mix of chopped bar and chips gives you the best of both worlds.
Finally, don't sleep on freshness. Baking soda and baking powder lose their punch over time — if yours have been open for a year, that may be why your cookies are flat and pale. Flour, too, can pick up off-flavors if it's been sitting around. None of this requires fancy or expensive ingredients; it just rewards paying a little attention to what's actually in your pantry.
When Things Go Wrong
Even with all of this, batches go sideways. Here's a quick troubleshooting cheat sheet:
- Cookies spread too thin? Butter was too warm, dough wasn't chilled, or there's too little flour. Chill and check your measuring.
- Cookies came out cakey? Too much flour, too much creaming, or too much leavening. Lighten up.
- Tough and dense? Overmixed flour. Be gentler next time.
- Dry and crumbly? Overbaked or over-floured. Pull them sooner.
Soft Cookies Are a Practice, Not a Trick
The most freeing thing I ever realized about baking is that there's no secret single ingredient — just a series of understandable choices. Once you know that warm butter spreads, brown sugar softens, overmixing toughens, chilling thickens, and residual heat finishes the bake, you stop following recipes blindly and start steering them.
So bake a batch this week. Pay attention to one variable. Take notes. Pull them a minute early. You'll be amazed how quickly your cookies go from "pretty good" to the kind people remember. And if your first batch isn't perfect, well — you've got more cookies to eat while you practice. That's hardly a hardship.
Zoe
Home baker and founder of Zoe's Baking Emporium, sharing recipes and the little lessons learned along the way.
Keep reading
 Baking Stories
My Journey Learning to Make Flan
Flan humbled me more than any other dessert. Here's the story of the cracked, curdled, weepy failures that eventually taught me to make it silky.
Read more → Decorating
10 Cupcake Decorating Ideas Anyone Can Master
You don't need pastry-school skills to make gorgeous cupcakes. These ten beginner-friendly techniques turn a tub of frosting into a showstopper.
Read more →